After a Friday evening conference call (which in no way should be construed as evidence of my lack of a life) explaining the cross-reference formats I developed for the One-on-One series, both Deke and Colleen felt that you, dear readers, should share in our hard-earned knowledge. So for my first official post, I thought I’d walk through the hows and whys of making cross-references work for you, using some pages from the upcoming Adobe Illustrator One-on-One book as an example. It’s a two-for-one sneak-peek on a new book plus explanation of a new feature!

Soft-coded cross-references have been something I have been longing for since the days of InDesign 1.5, when I first made the leap from Quark and FrameMaker. And finally, with InDesign CS4, Adobe heard my pleas. Of course, like many new features, it needs a bit of explanation…
Before we start, some background info is in order. Cross-references refer to any bit of text in a book that refers to another element; it might be a figure callout, a reference to a heading, or even instructions to check out a sidebar. Soft-coded cross-references are a little piece of InDesign magic that allows these bits of text to be created automatically, and update on the fly. A cross-reference must refer to an existing paragraph (or, less frequently, a text anchor)—in order to create a cross-reference, you have to “point it” at a source paragraph. They behave very much like hyperlinks on the Web—so much so, InDesign puts them inside the Hyperlinks palette.

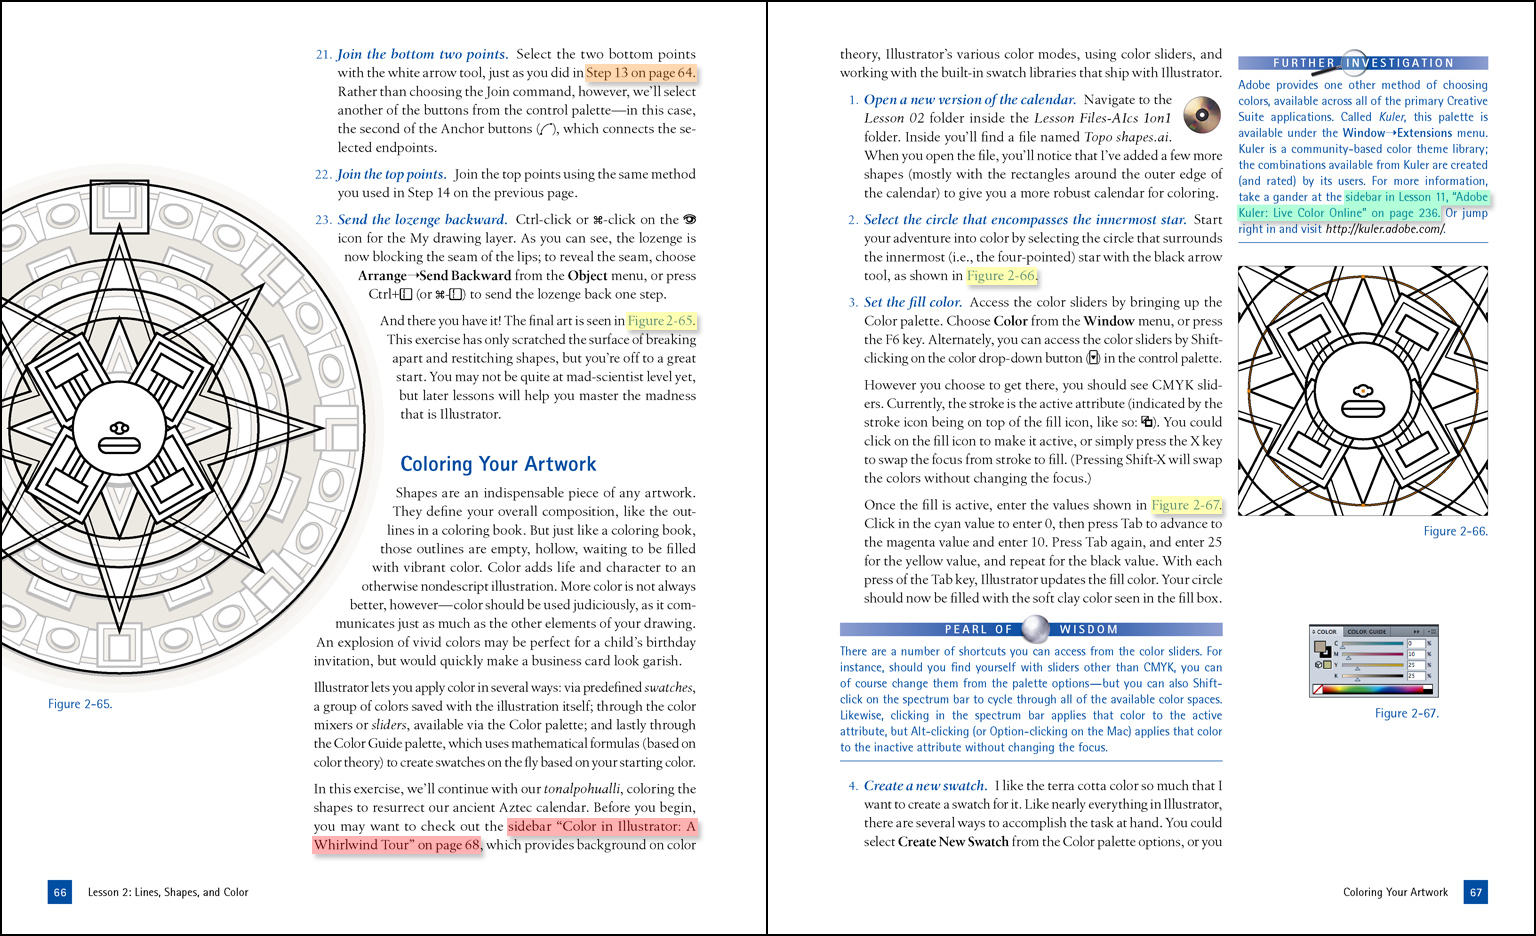
Take the spread below, pulled from Lesson 2 of the Illustrator book. (Click for a larger, somewhat legible version.) In it, I’ve highlighted all of the text that is in need of some cross-reference love.

InDesign comes with some standard cross-reference formats already built-in (a total of nine, to be precise) that are useful for referring to headings, page numbers, even text anchors. But none of InDesign’s default formats are appropriate for these cross-references; because of the One-on-One template’s quirks, I needed to create some unique formats for this project.
To begin, look at the figure references, highlighted in yellow. These figure references point to the small blue labels that appear under the figures—paragraphs that are styled with the aptly-named FigureNumber paragraph style. (FigureNumber is a style I created for the template.) This paragraph style, in turn, uses InDesign’s auto-numbering feature to create the “Figure 2-65” text that appears on the page. (The period character is the only character actually typed into the paragraph; we did this as a workaround because InDesign refuses to display automatic numbering in empty paragraphs. [It was our only sad moment when we celebrated auto-numbering in CS3.—cw])
Once you have the cursor where you want to put my cross-reference (or in this case, highlight the text I want to replace with the cross-reference), click the “Create new cross-reference” button to bring up the New Cross-Reference dialog. From the list on the left, select the source paragraph style (FigureNumber); once that’s selected, InDesign creates a list of all the paragraphs matching that style in the right-hand box. Now just scroll through the list, find the source paragraph, and select it. For the cross-reference format, I choose “Paragraph Number”, as it’s the closest built-in format. The edit button (circled below) allows you to customize the format as much as y’d like.

Editing cross-reference formats can be a little daunting at first. InDesign uses special tags (XML tags, for the curious) to represent various elements that can appear in the cross-reference. You don’t need to know the tags themselves, as they can all be inserted from the + menu on the right side of the dialog box, but it’s useful to know what they mean:
- <fullPara />
- The entire text of the paragraph, including any auto-numbering.
- <paraText />
- The text of the paragraph only, without any numbers.
- <paraNum />
- The auto-numbering only, including any text before the number, but not any of the punctuation following.
- <pageNum />
- The page number that the source paragraph appears on.
- <chapNum />
- The chapter number generated by InDesign for the document.
- <cs name=”character style”>text here</cs>
- The only tag that is not self-contained; it specifies that text here should be formatted with the style specified by character style (where both of those values are to be replaced with actual text or style names). This is necessary when some, but not all, of the cross-reference needs to appear in a specific character style.
In the case of the figure references, <paraNum /> is exactly what I want. So why do I need a new format? The references are supposed to appear in blue—and I’ve already specified a character style called Xref to do just that. So click the + icon at the bottom left of the dialog to create a new format based on the currently selected one, change the Character Style for Cross-Reference option to Xref, and rename the format to something more meaningful, like “Figure reference”.

A click on both dialog boxes’ OK buttons, and the figure reference is automatically inserted and formatted with the proper character style.
So what about the other cross-references? If you take a look back at the text highlighted in orange—“Step 13 on page 64”—it’s clear that no built-in format will produce that result. But the “Paragraph Number & Page Number” comes closest, so that’s where I started. Again, highlight the text to replace, click the “Create new cross-reference” button, and select the source paragraph. In my case, I made sure the format is set to “Paragraph Number & Page Number”:

Once that’s set, click the edit button again, and create a new cross-reference format. In this case, the built-in format is just missing the leading word Step, so all I needed to do was type that text before <paraNum />, change the format name, and click OK. Once again, InDesign works its magic, and generates the cross-reference automatically.

The last two formats are similar—and they refer to paragraph text, rather than paragraph numbers. Once again, it’s a question of finding the closest built-in format and bending it to serve you purposes. Start with the text highlighted in red, referring the reader to a sidebar on the next spread.
This is a similar situation to the last format—one of the built-in formats is close to what I needed, but was missing the leading word. The drill is the same: highlight the text, create a new cross-reference, and pick the source paragraph and format, as shown below. This time, I picked “Paragraph Text & Page Number”, as that’s closest to what I ultimately wanted.

A click of the edit button shows what this format is missing—the word “sidebar”. I’d rather not have to type it every time I reference a sidebar, so I put it directly in the cross-ref format so InDesign does the heavy lifting. (One could argue that I could also add the word “the”, but that assumes that the cross-ref will never appear at the beginning of a sentence. Best not to assume.)

Lastly, there’s the one and only cross-lesson reference, highlighted in teal. This reference is nearly identical to the last, so I based it on my new “Sidebar reference” format. But being as it’s a reference to a separate document, I needed to have that second document open before I began. Once the document was open, I could highlight the text to be replaced, and create the new cross-reference. This time, I had to change the destination document, shown in the first drop-down menu.

Finally, click the edit button to bring up the cross-reference format dialog box. For this final cross reference, I wanted the format to be sidebar in Lesson [lesson number], “[sidebar title]” on page [page number]. Translated into InDesign’s XML tags, that looks like what appears in the screenshot here:

Note that all I needed to do is add the text “in Lesson <chapNum />, ” to the cross-reference format; InDesign does the rest, automatically pulling the number from the second file. A word of caution, however: when making cross-references to a second file, the source and destination files must be saved in order for the cross-reference link to be preserved. InDesign places a destination link whenever a cross-reference is created, and thus both files will report that they have been modified.
So that’s some of the hows, but what about the whys? Why would I jump through all of those hoops when I could just type the text and be done with it? Two big reasons come to mind:
- Automatic updates. If my page numbers change, InDesign will update any page numbers in the chapter. (Cross-chapter references are updated when the book file is updated, or by choosing Update Cross-Reference from the Hyperlinks palette menu.) Likewise, if I suddenly decide I need to insert a figure halfway through the lesson, InDesign will (once I choose the Update Cross-Reference command) fix every single reference to the new numbers.
- Preserved links. When I generate PDFs from documents with soft-coded cross-references, it creates links automatically in the PDF to jump from the reference to the destination. Likewise, when exporting to XHTML, cross-references are converted to hyperlinks. Depending on how the document may be distributed digitally, these links can come in very handy.
Cross-references may not be sexy or visually exciting, but if you spend any time working on long documents, you’ll quickly grow to love them. Honestly, I dread to think back to the days before them—as do the One-on-One editors and proofreaders—and referencing everything by hand. Stay tuned for more book-building tools! (Assuming Deke and Colleen let me off-leash again.)


Thanks, David.
It’s your hard-earned knowledge, Deke and I just ask you to make it easy for us after you’ve figured it out. Then we whine while we exploit your ability to figure out how to put new tools to practical use. Seriously, everyone should have this kind of guidance, and it’s extremely cool of you to share it will all of dekeWorld.
Oh, and we all know who doesn’t have a life on Friday nights. ;-) It’s because we’re recovering from Martini Hour on Thursday, of course.
Martini hour
this is essential for everyone.. please never forget thursdays
Much appreciated…
Thanks very much for taking the mystery out of cross reference formats. The know-how you imparted will really add muscle to my use of the feature.
Quite welcome
If you’ve got other InDesign questions, send ‘em this way (or even to the Deke Lounge)!
CS4 One-on One Book
I am 70 years old with I thought good eye sight but I have trouble recognizing the icon symbols with some of the short cuts. Next time can you make them larger for use older folks.
Also, I am look at page 48, Video Lesson 2: Text and Frames “purple” box.
The color scheme again makes the icons also unreadable for these eyes.
Help
Don (intrepid09)
thank you
i’m learning new things because of you and using them. Cross referance formats was one of them and i got it. Thanks for sharing.
Regards, iddaa
Wow Wee!
Thanks for this tutorial Deke! I’m just going through your InDesign One-On-One DVD for style sheets along with Dave Blatner’s InDesign Essentials. I’m an Illustrator wiener and InDesign is new to me so it’s nice when I get the time to watch your tutorials. They take the mystery out of it and get right down to the bare bones of what you need to know.
I’m getting ready to update an Illustration Guide that hasn’t been updated since 1982. Needless to say it’s long overdue. Just a few things have changed since then. ;)
OFF Topic Indesign Question
Deke,
The info provided in this tutorial proves you are a hard core Indesign guy. So I have a questions for you that has challenged to me.
I’ve been working with the export to SWF option in Indesign for a few weeks so I’ve got a good idea of the settings etc. What I can’t figure out is when I create an external URL link as a button my Indesign created SWF insists on opening a new page instead of targeting the current browser window. So I’m thinking there is a secret sauce code I could add to the front of my button URL in Indesign that would tell Indesign that this URL link should be directed to “self” instead of a new browser window. Any thoughts or secret sauce knowledge?
Roger
Head Camp Counselor
Camp Photoshop
http://www.campphotoshop.com