Unless you’ve been living under a moon-sized rock that blocks not only sunlight but all other incoming information, you probably know there’s a total solar eclipse headed USA-way on August 21. Deke, of course, saw this as an opportunity to buy some new photo gear…I mean, learn how to photograph eclipses. I saw it as an opportunity to book an eclipse-priced cabin in Alliance, Nebraska (home of Carhenge)...I mean make sure we didn’t just settle for the 90-something-percent effect here in Boulder. Thus, we reached out to the most patient and prepared (two things we barely understand) photographer of skyward phenomena we know, Seán Duggan. As you can read from Seán’s previous ecliptical experiences, witnessing an eclipse doesn’t really have to be about expensive gear (Deke), but it does require some planning ahead (Deke, I mean, Colleen).—-Colleen
On August 21, the Sun, Moon, and Earth will move into perfect alignment over the continental United States, creating a total solar eclipse that can be seen from a ribbon that stretches from coast to coast. In that 2-or-so minutes, day will turn into night along the centerline of the path of totality.
The last total solar eclipse visible anywhere in the U.S. occurred in February 1979, and the last total eclipse that extended from coast to coast happened nearly a century ago. So, it’s no surprise the eclipse is big news (Deke aside, the mania among non-eclipse nerds seems to be peaking this week) and many people are planning to see it, photograph it, and jostle for ideal position to do both.
I was fortunate to see that North American total eclipse in 1979 (when I was an enthusiastic high school photo geek), and a 98% total eclipse in Iceland two years ago (when I was decidedly older and in possession of slightly more digital photo gear). For the dekeCommunity (and sky shooters everywhere), I want to focus of some of the things to consider for photographing this extraordinary, and possibly once-in-a-lifetime event.
Protect Your Eyes! Protect Your Camera! Protect Your Images!
Looking at the sun without proper solar viewing glasses or filters, even during an eclipse, can cause permanent damage to your eyes. The only time it’s safe to view an eclipse without solar viewing glasses is during the short minute or two of totality (and this also goes for looking through a camera or binoculars; they should be filtered, as well).
When looking for solar viewing glasses, make sure they’re rated safe for direct solar viewing, and that they meet the requirement for ISO 12312-2-2015. (And don’t just take the packaging’s word for it, since unscrupulous vendors are printing whatever they like on their packaging to profit from eclipse-mania.) To be sure, here’s a link to NASA’s approved vendors for eclipse-viewing glasses.
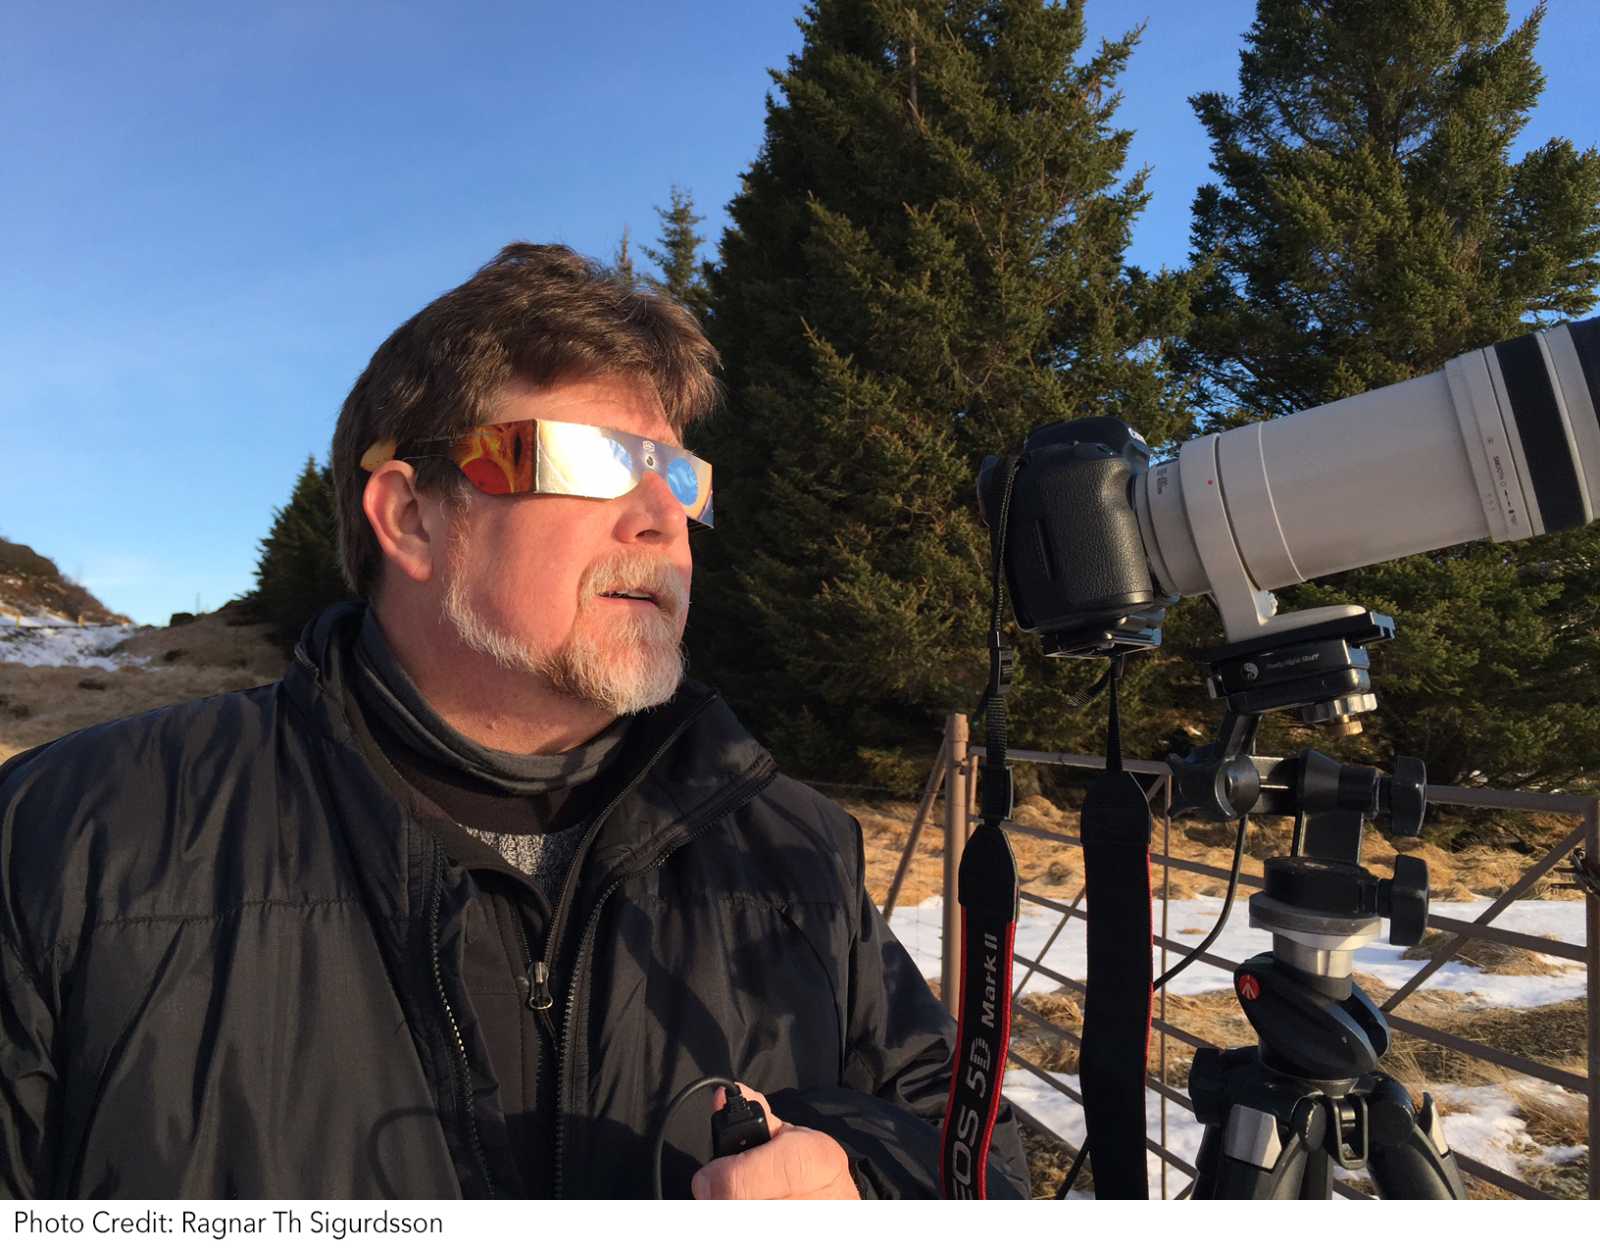
People, we aren’t fooling around here. It’s hard to keep your Photoshop and photography skills up-to-date if you damage your retinas, so it’s in our interest here at deke.com that you take care of you. Your regular sunglasses will not do, no matter how cool you think you look. Besides, check out Seán at the top of this post modeling how to look cool and controlled wearing approved paper eclipse glasses.—-Colleen
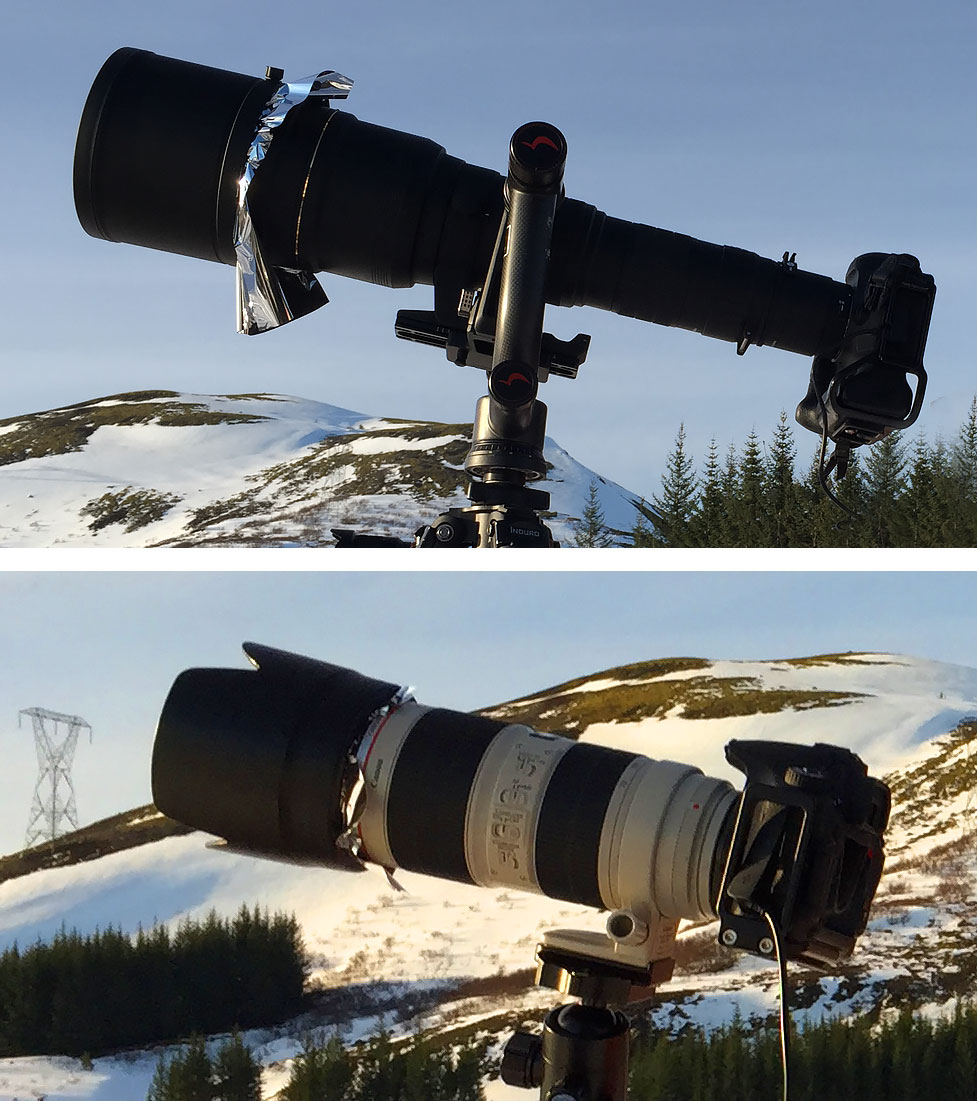
Just as you protect your eyes when viewing the sun, you also have to consider using a special solar filter for your camera. Any shots using a telephoto lens where you are zoomed in and focused on just the sun will need a solar filter. These are available in a format similar to standard screw-on photo filters, filter material framed in cardboard holders that fit loosely over the end of your lens, or as sheets of thin black polymer or silver mylar material that you can cut to size and attach to the front of the lens. Here, you can see my set up from Iceland 2015—-using a sheet of filter material wedged in between the lens and the hood.
Whichever filter you purchase should be rated for direct solar viewing. Standard photographic ND filters are not sufficient for close-up images of the sun and using them could damage your camera’s sensor. Make sure the filter is attached to the front of the lens (the side closest to the sun) and not over the camera’s viewfinder.
Choose Your Location and Angle
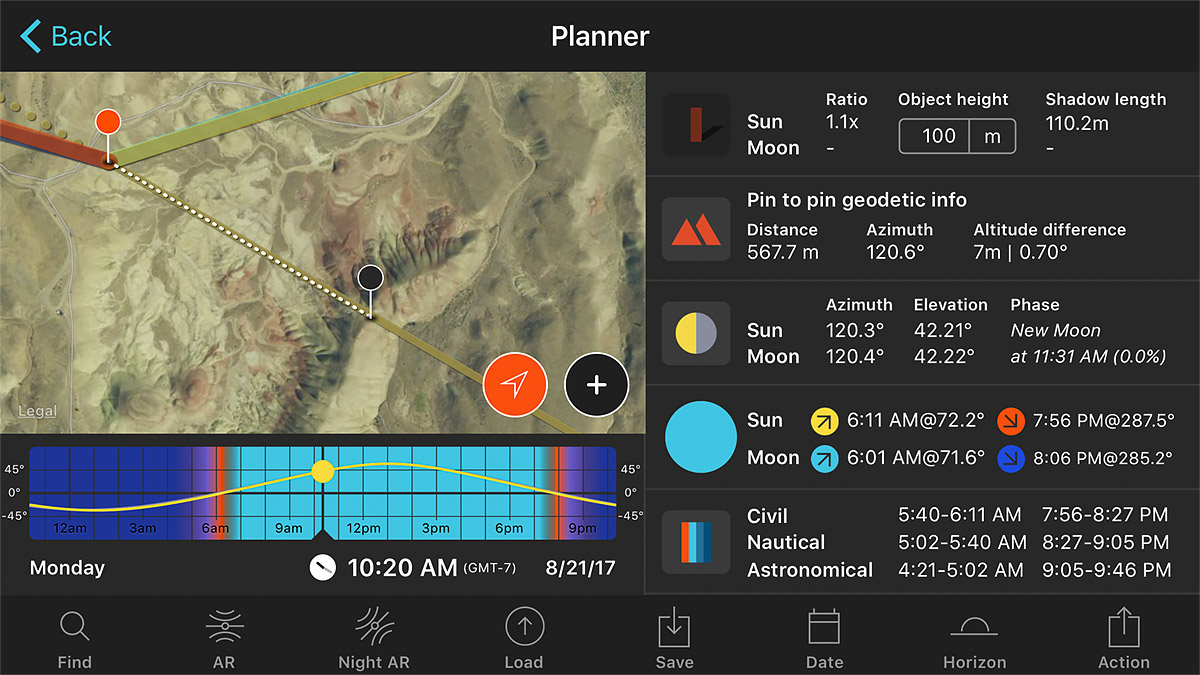
Once you know where you’re going, you’ll need to know where you’ll be pointing. In making my own plans for the eclipse, I’ve used an app called Photo Pills along with Google Earth to get a sense of the landscapes near where I will be on August 21, as well as seeing exactly where I need to be to get the photo that I want. Photo Pills is an excellent app that’s available for Android and iOS that lets you precisely plan your image based on where you will be and where you want the sun to be in relation to the landscape.
Choosing a Focal Length
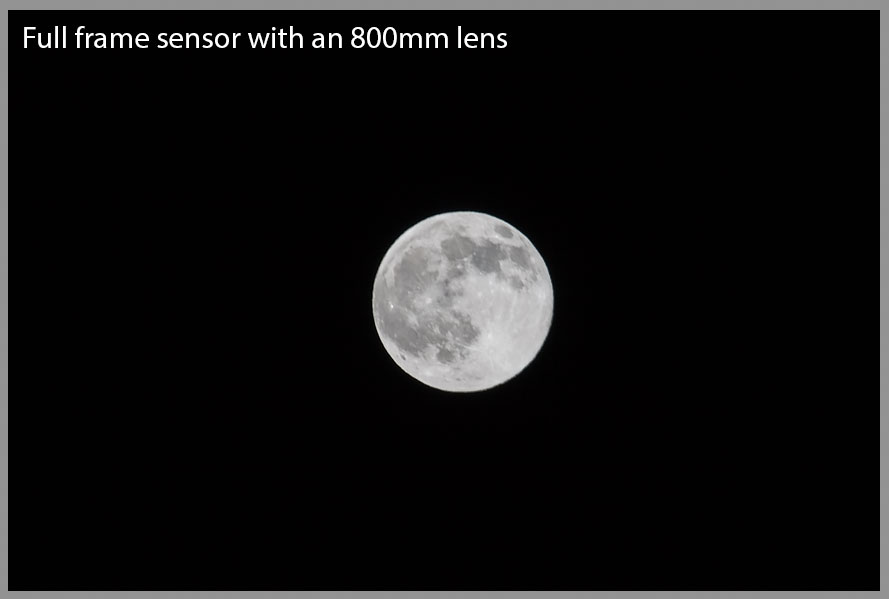
If you want a view showing a close-up, zoomed-in view of the sun, then you’ll have to purchase, borrow, or rent a telephoto lens. How much telephoto do you need? For approximate size reference, the image of the full moon below was made on a full-frame sensor with a 100–400mm zoom and a 2x converter, for a focal length of 800mm.
And this shot of the 2015 Iceland eclipse was made with a full-frame sensor camera and a 400mm lens.
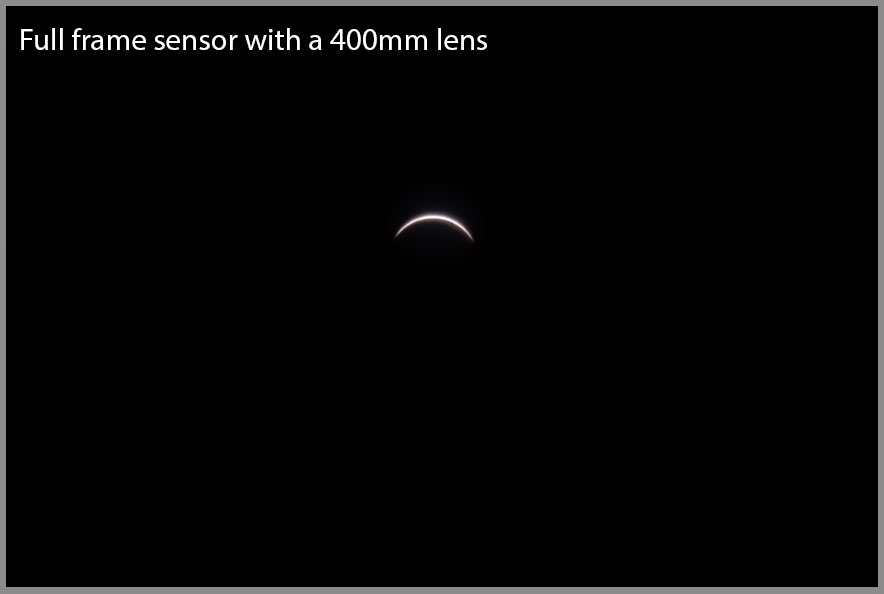
Your focal length mileage will vary, of course, if you’re using a camera that has a smaller image sensor. The bottom line is that more telephoto is better if you want the sun to appear as large as possible in the shot.
Stabilize the Camera
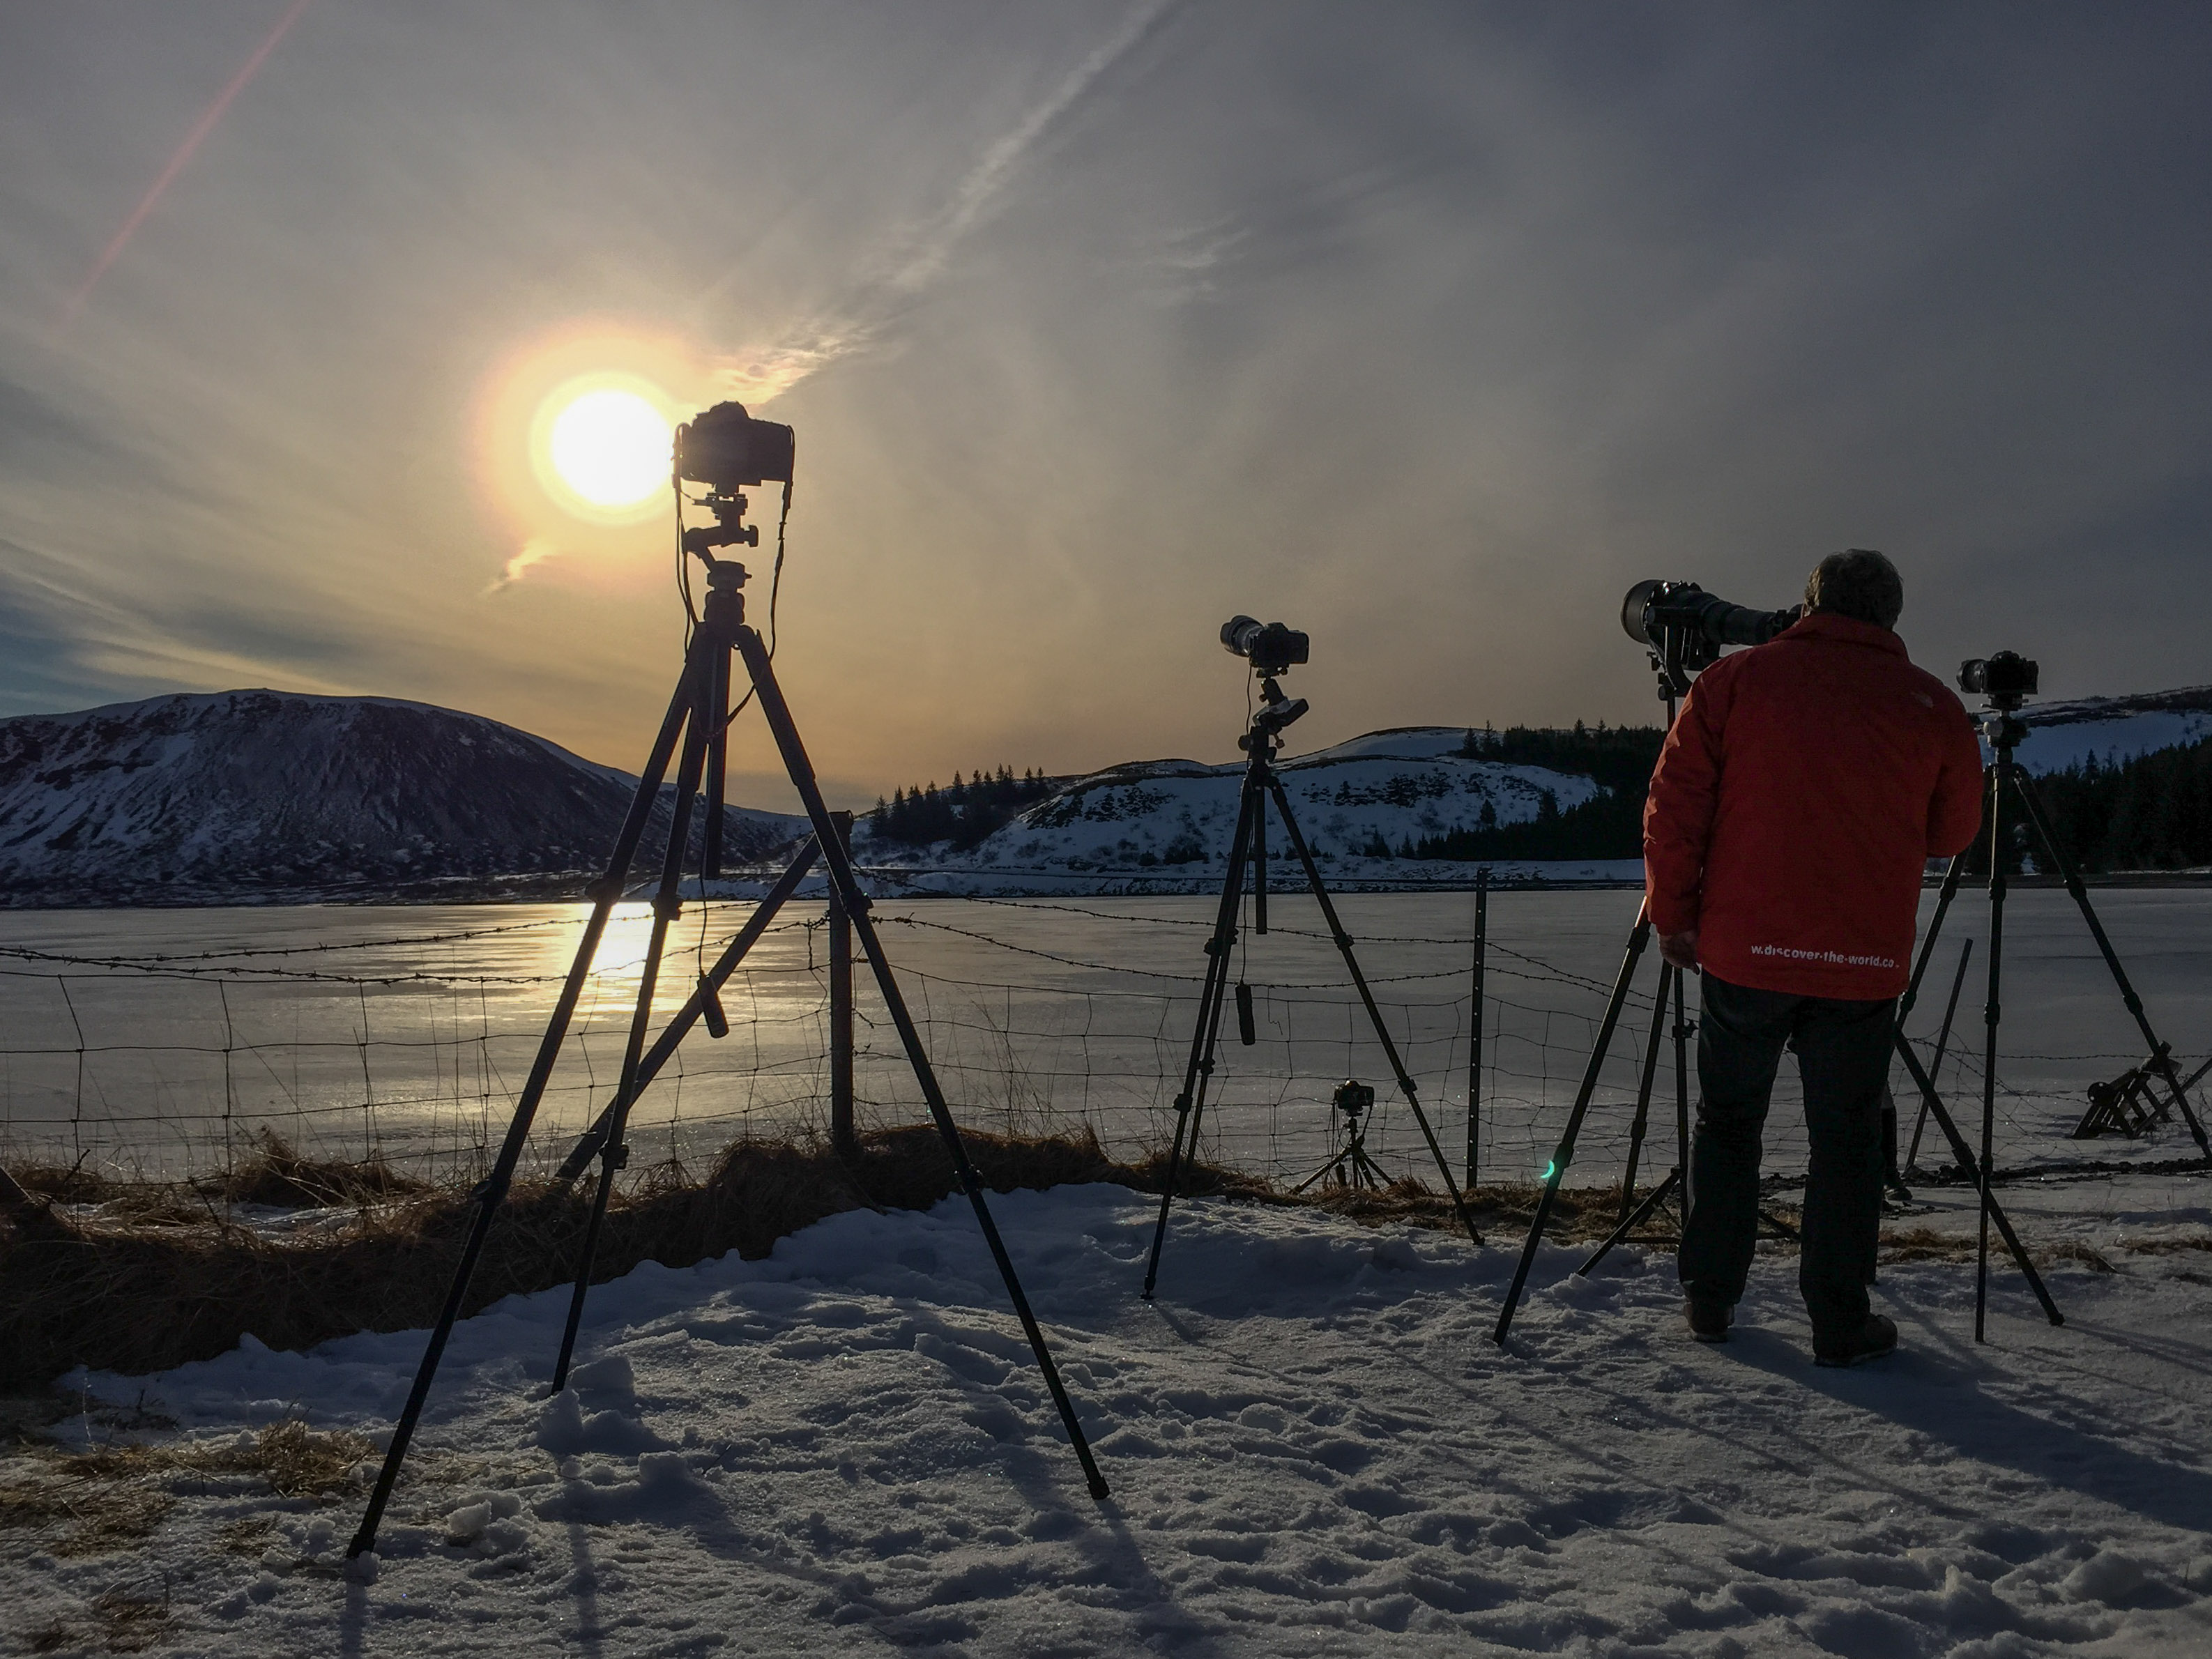
I definitely recommend a sturdy tripod for photographing an eclipse. This is especially important with a large camera and a big lens to ensure that camera motion doesn’t adversely affect the sharpness of the shots. Plus it just makes shooting the eclipse a lot more convenient, since the camera is always positioned and pointed more-or less-in the right direction (with a telephoto lens you’ll have to adjust camera framing throughout the eclipse as the sun moves across the sky).
(By the way, in the image below, check out the shape of the moon eclipsing the sun caught in lens flare in the lower right.)
Consider Your Exposure
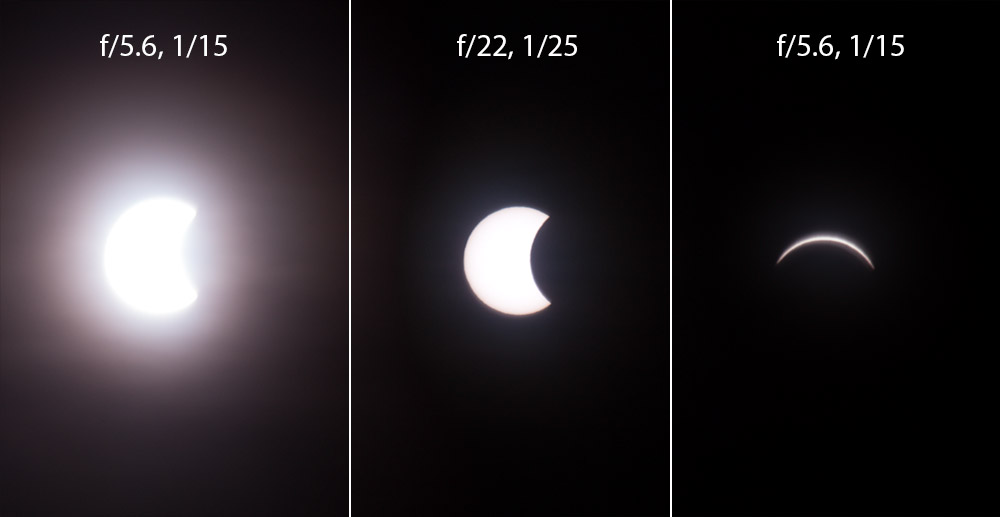
The “right” exposure will depend on the type of shot you’re making. For a zoomed-in view of just the sun shot with a telephoto lens and a solar filter, the result will essentially be a bright white or orange disk with a black shadow moving across it. You’ll want to find an ISO/Aperture/Shutter Speed combination where you can clearly see the shape of the sun and the moon, but where the shutter speed is not too slow.
Consider the images below from the Iceland eclipse. I took the first shot as a test when the eclipse started, and it’s so overexposed you can’t see the shape of the solar disc (f/5.6, 1/15). A few shots later I’d dialed in a much better exposure (f/22, 1/25). In the third shot, taken near the maximum coverage of that particular eclipse (98%), I modified the exposure to compensate for less light to f/5.6 a 1/15th. The ISO for all shots was 400. Shooting in manual mode will ensure that the exposures are consistent.
For more detailed eclipse exposure information, as well as other info regarding photographing an eclipse, check out Fred Espenak’s Mr. Eclipse web site.
Include the Landscape, Make a Composite, or Even Try a Time-Lapse
Or all of the above if you’re Team Deke (or Team Seán, I gather).—-Colleen
If you don’t have a long telephoto lens, consider making a shot that shows more of the landscape in the foreground. You’ll get to create a photo that’s different from the standard close-up shots of a solar eclipse everyone else is taking, that frankly, sometimes start to look all alike (Sorry, Deke. I’m sure yours will be special.) The most striking time to do this, especially if you don’t have a solar filter, is just before, during, and right after totality.
Another effective way to create an interesting eclipse shot is to use Photoshop to combine many images of different eclipse phases. With an intervalometer you can configure the camera to take an image at regular intervals, such as every 5 minutes. Use a wide-angle lens with a solar filter for most of the first half of the eclipse to show the shape of the moon covering the sun. Remove the filter for the 1 or two minutes of totality (you may need to manually trigger a few shots during this time), and then replace the filter over the lens for that latter half of the eclipse. With the camera in the same position, take a shot of the landscape with a good overall exposure for the scene.
Here’s how I used this approach for a composite of a total lunar eclipse in April 2014.
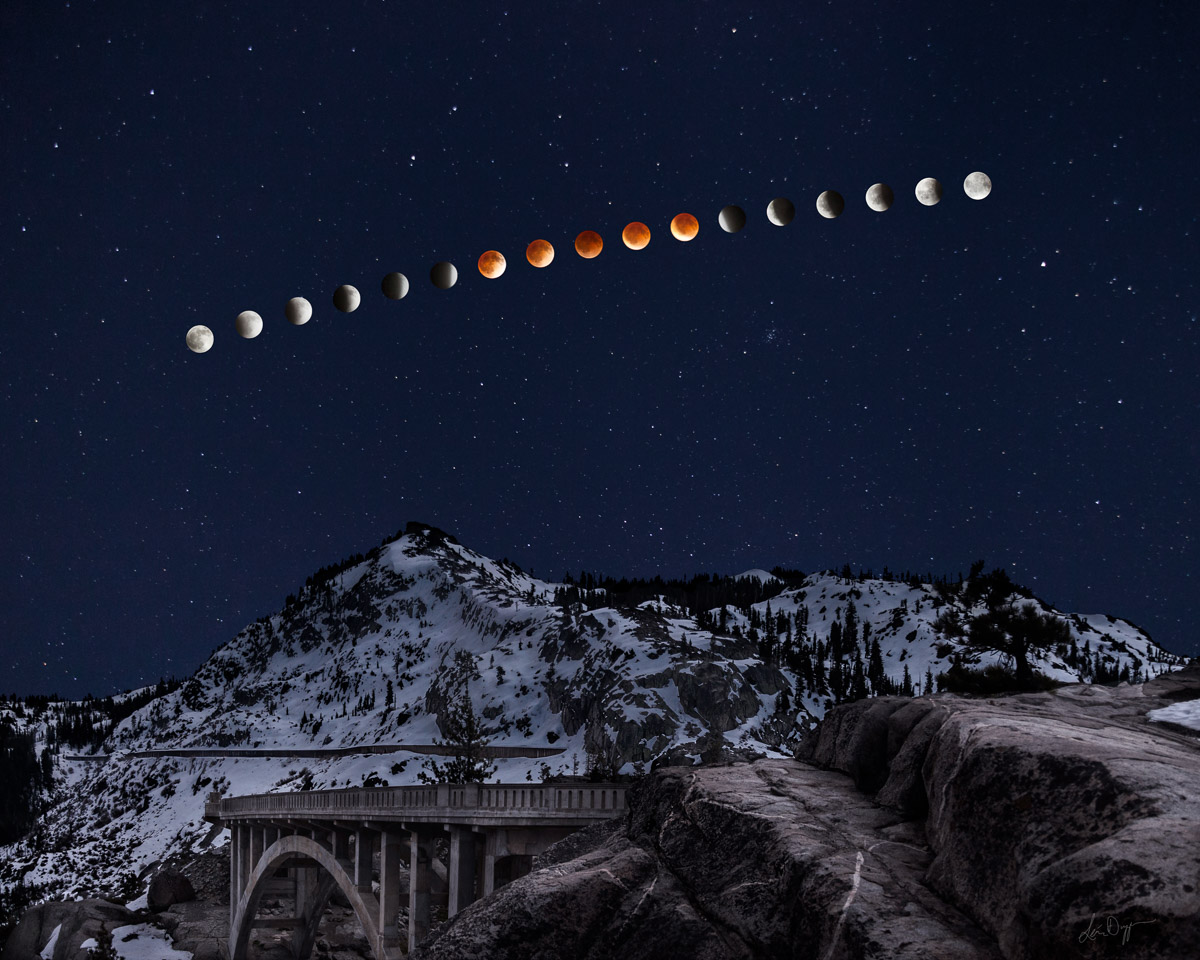
The same steps can be used for a series of solar eclipse images. In fact, that’s the approach I’m planning to take this time (in addition to a time lapse).
You can check out Seán’s Lynda.com / LinkedIn Learning course Photographing and Assembling a Lunar Eclipse Composite to see how this image was made.
Here’s another landscape possibility: if possible, I would encourage you to set up a second camera and shoot a time lapse of the eclipse with the landscape. Lots of people will have close-up shots of the moon’s shadow on the sun and those all look the same. But time lapses showing the scene getting darker and then lighter again can look pretty cool, and be a nice record of the place where you experienced this event. Here is a time lapse of a partial eclipse in Iceland in 2015.
Timelapse of partial eclipse in Iceland 2015.
I positioned my camera down low, close to the ice along the shore of a frozen lake. Though I also shot close-ups of the sun with a telephoto lens, the time lapse was by far the more interesting visual record of the experience.
For this time lapse I used a 24mm lens on a full frame DSLR. I didn’t use a solar filter, since the composition was essentially just a landscape image and it’s not uncommon for landscape photographers to shoot into the sun. I set the exposure for the overall scene before the eclipse and it stayed constant throughout the entire event. This allowed for the scene to darken naturally as the sun was covered by the moon, and then gradually lighten again. Make sure your batteries are fully charged and carry spares; long time lapses can drain a battery faster than average shooting. This video is made up of nearly 1,100 raw captures that were adjusted in Lightroom and assembled into a time lapse in Photoshop.
If You Can’t Beat ‘Em, Capture Them in Your Shot (or How to Cope with the Inevitable Crowds)
Over 200 million people live within the path of totality, or within a day’s drive of the path. And everyone in California claims they’re driving to Oregon. So, large crowds are expected at many sites. Although this could be a huge hassle, especially where traffic is concerned, it also could be an interesting opportunity for people photography and documenting a truly historic event (need stock photos of a mass migration, or epic traffic jams…this is your chance!). The main show will be up in the sky, but take time to document what’s going on around you down on earth, too. A camera phone is an ideal tool for this, especially if your other cameras are pointed up into the sky.
Have a Happy Eclipse Day!
A total solar eclipse can be a truly awe-inspiring phenomenon to experience. Although they happen with some frequency, they’re often over the ocean, in remote parts of the world, or obscured by clouds. If you live in the U.S, this is a rare chance to see an eclipse reasonably close to home. And while creating good photos of an eclipse is certainly an important goal for photographers, don’t get so wrapped up in your camera gar that you forget to take time to just experience the wonder of it all.
Seán, we can’t thank you enough for sharing your sage advice and stunning art. I’ll report back on how things went in Nebraska, and if things go well, dekeIversians can expect to see eclipse photos in some training near you!—-Colleen


